Required Parts:
- Battery disconnect switch
- Wiring harness (10 sq or more)
- Additional necessary parts for installation
Tools Needed:
- Wrench set
- Torque wrench
- Electrical tape
- Waterproofing materials
Procedure:
- Preparation:
- Ensure you have all necessary parts and tools.
- Park the truck on a level surface and turn off the engine.
- Turn the starter switch to the “LOCK” position.
- Wait at least 10 minutes to ensure all systems are fully shut down.
- Disconnect the Battery:
- Locate and disconnect the negative terminal of the battery using a wrench.
- Secure the disconnected terminal to prevent accidental reconnection.
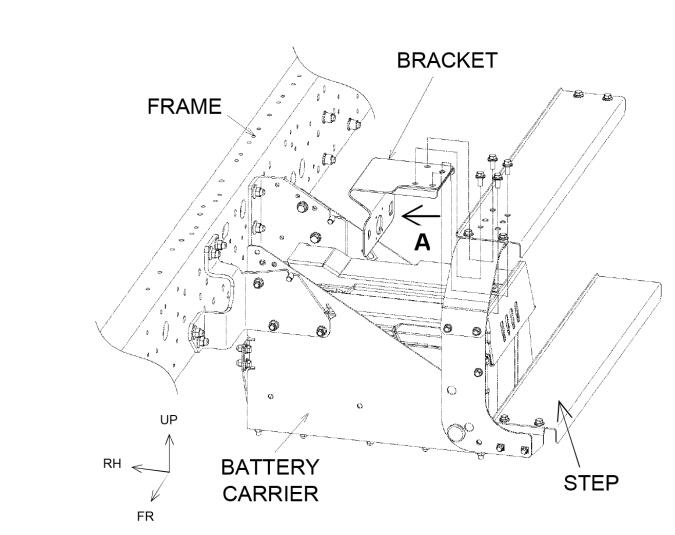
- Locate the Mounting Position:
- Identify the bracket on the chassis where the disconnect switch will be mounted. Refer to the vehicle’s manual or the provided diagram for the exact location.
- Prepare the Wire Harness:
- Create a wire harness according to the diagram provided.
- Ensure the harness is made of 10 sq or thicker wire to handle the current load.
- Ensure all connections are secure and waterproofed.
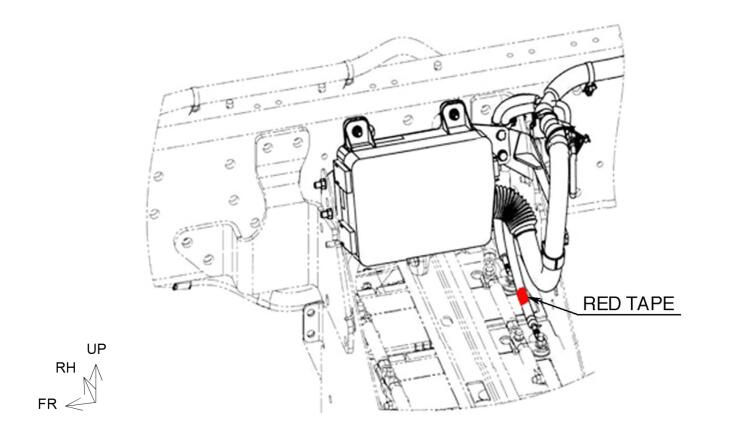
- Disconnect the Existing Harness:
- Locate the wire harness wrapped with red tape.
- Disconnect this harness from the positive terminal of the battery.
- Install the Disconnect Switch:
- Install the disconnect switch harness between the positive terminal of the battery and the harness wrapped with red tape.
- Ensure the connection type matches the diagram provided for proper installation.
- Secure Connections:
- Tighten the terminal nuts to a torque of 108±10 kgf.cm (8.1±0.7 lb.ft).
- Make sure all connections are waterproofed to prevent corrosion and short circuits.
- Final Checks:
- Reconnect the negative terminal of the battery.
- Verify all connections are secure and properly insulated.
- Test the battery disconnect switch to ensure it operates correctly.


Related Contents:
Nexiq USB Link
2024.02 HINO Diagnostic Explorer DX3/DX2 Diagnostic Software Free Download
Notes:
- While this alteration will cut off the power circuit, the after-run circuit of the Engine ECU will continue to function to maintain the ECU’s operations.
- When performing welding operations or other work, refer to the “Welding Work” and “DEF-SCR System” sections in Chapter 4 of the vehicle’s manual.
For more detailed troubleshooting and repair cases, refer to the Hino Troubles Repair.